You may be familiar with the Transifex translation service. It can be a useful tool for translating pages on your static website or in an app you’re developing. However, the needs of a WordPress site are very different from software development. In this article, I’ll explain how Transifex works, then cover the best Transifex alternative for your WordPress site.
Using Transifex to Translate Your Website
The first thing to understand about Transifex is that it’s a SaaS, or Software as a Service. The service is completely separate from your WordPress site, and there’s no plugin to install. However, you’ll need to add a snippet of JavaScript to your site.
To get started with Transifex, you need to create an account on their website. It’s free to create an account — they offer a 15-day free trial with no credit card required.
Once you have an account created, you can create a new project or try their demo project. For this article, I’m going to demonstrate creating a new project, which is what you would do when translating your WordPress site.
How Transifex Works
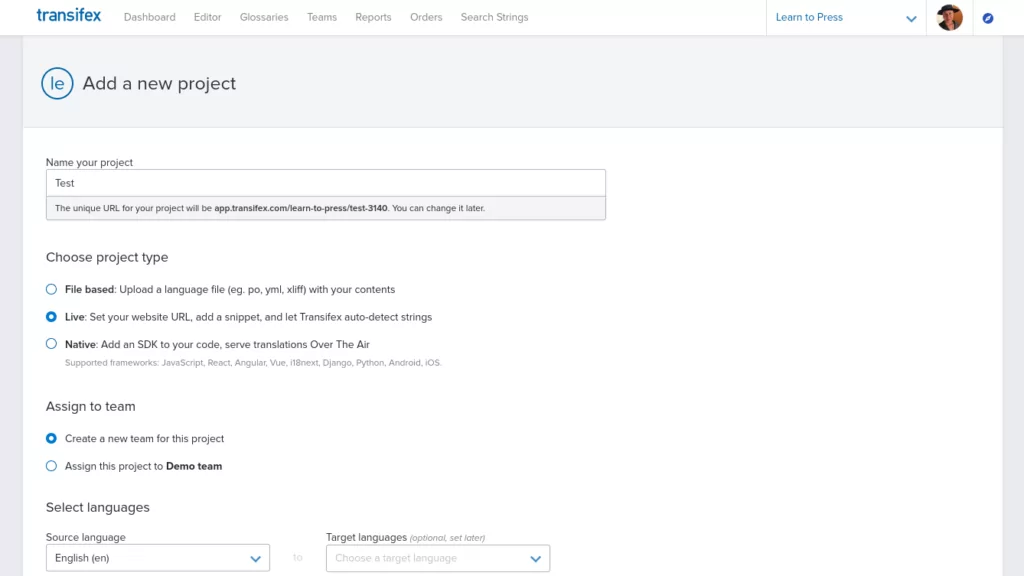
When you add a new project, you have some choices to make. The first choice is to decide what your project type will be. There are three types to choose from when creating a project:
- File-based
- Live
- Native
When using File-based, you need to start with a prepared language file, such as a po, yml, or xliff that contains the contents you want to be translated.
The Live option allows you to enter the URL of your website and let Transifex auto-detect strings.
Native is an SDK solution that you can use to integrate with JavaScript, React, Python, or other languages used in developing software.
Since we are talking about your WordPress site, the logical choice would be to use the Live option.
You can then select to assign your project to a team, so you can work with others on localizing your content.
The next step is to select the languages you’ll be translating. First, you choose your source, and then you’ll select all the languages you want to have your strings translated into. You can add as many languages as you need.
When finished adding languages, you can click the Create Project button.
Translating Your Site Using Transifex
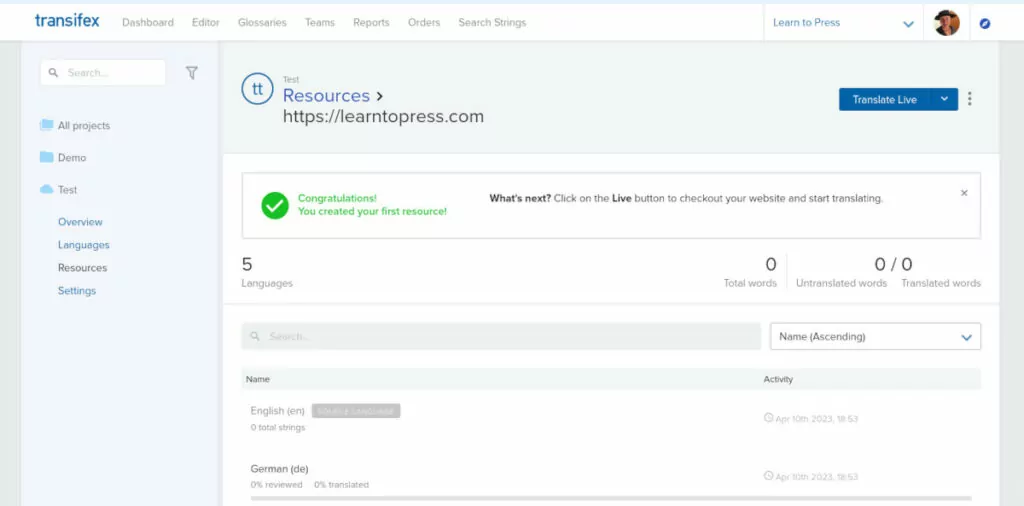
The next step is to enter the URL of the site you want to translate. Transifex adds this to your Resources.
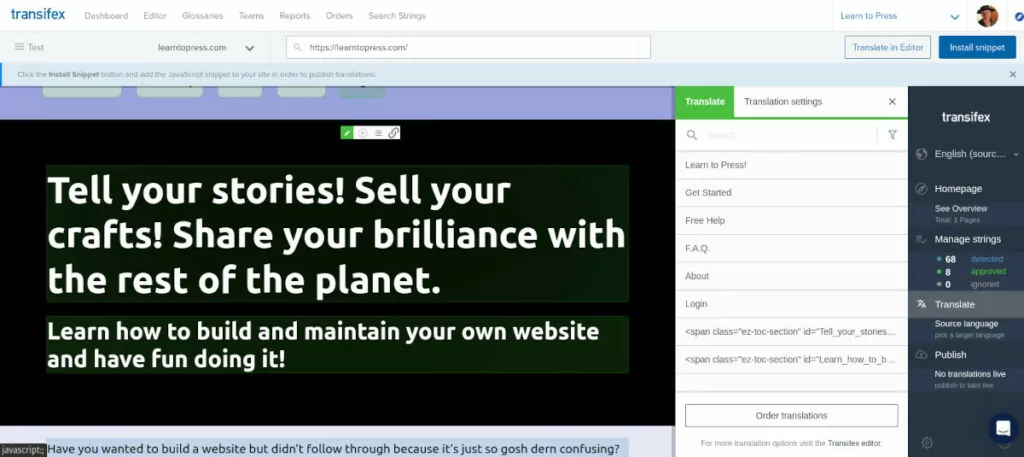
There are two ways to translate your site using the Transifex service: using the Live Translation tool in your account on the Transifex site, or on your own site. Translating on your own site requires that you add a snippet of JavaScript on each page you’d like to translate.
It’s easiest to use the Live Translation tool. However, to publish the translations to your WordPress site you’ll need to install the JavaScript snippet they provide for your project. Correctly installing JavaScript on WordPress page headers can be complicated. It’s easiest to use a plugin, but you’ll need to find one that allows you to place the snippets on specific pages rather than within the entire site’s header.
The Live Translation tool brings up a preview of your site in the window. To begin the process of using Live Translation, you need to select any strings on the page and click the checkmark to approve them for translation.
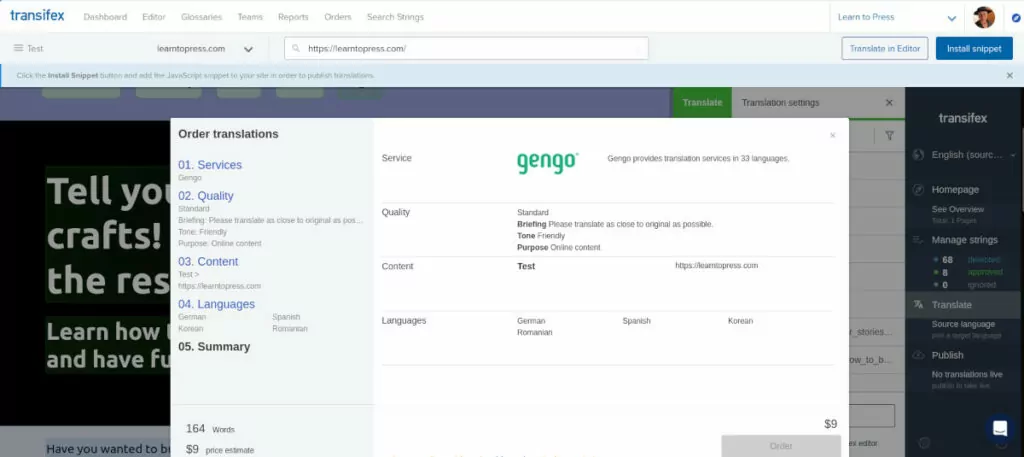
Once you’ve selected all your strings, you can click the Order Translations button. This is exactly how it sounds: you need to select a service and order the translations using a paid third-party service. Some of the services available will only translate European languages, so you need to be careful about which one you choose — especially if you wish to translate your strings into Korean or Swahili, for example.
Once you create an order and make payment, you can publish your translation. Again, you’ll need to have the JavaScript snippet installed correctly on your WordPress site to make this work.
Pricing for Transifex
As I mentioned, there’s a 15-day free trial of Transifex. After that, you’ll need to choose a pricing tier that fits your budget.
Basic
This is a starter plan for smaller teams, billed annually at $70 per month. It includes the basic functionality I outlined above, and you get unlimited projects and files. It also includes up to 50,000 words, and you can select more words if you need them — the price will adjust as you increase the volume.
Premium
If you need more advanced features like automations, bulk string actions, or advanced translation memory, you can choose the Premium tier. Premium is billed annually at $105 per month. It includes all the Basic features plus the advanced features I just mentioned. Same as Basic, pricing starts at 50,000 words, and the price increases as you add more to your plan.
Enterprise
You’ll need to contact the Transifex sales team to get pricing for the Enterprise tier.
The prices I’ve outlined here don’t include any translation services you use under the Live Translation tool. Those are billed separately according to the service you choose.
Best Transifex Alternative for WordPress
I’ve covered the basics of Transifex, so let’s compare it with our translation tool, TranslatePress. While Transifex is a solid service, it may be best suited for static websites or software applications. If you’re running a WordPress site — or managing several WordPress sites — TranslatePress is a much better fit. Let me explain why this is a good Transifex Alternative.
Ease of Use
The first advantage of using TranslatePress is that it’s easy to use. Once you install the plugin, all the features and tools are accessible from within your WordPress Admin Dashboard. It’s also a no-code solution. There are no JavaScript snippets to put in your site’s header — the plugin is all you need.
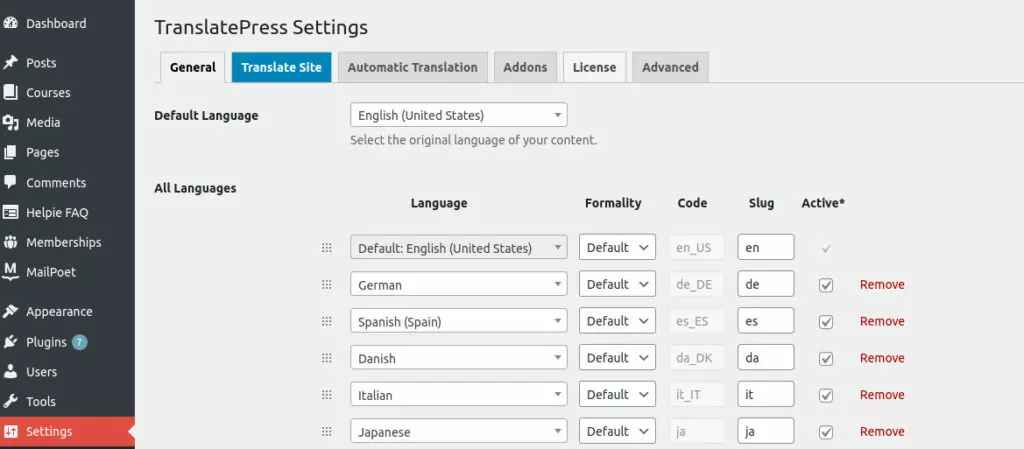
Configuring TranslatePress is easy and virtually painless. The initial setup screen is simply laid out and easy to navigate.
In the settings menu under the General tab, you can select your site’s default language and add as many alternative languages as you like.
And, there’s no reason you need to worry about uploading PO or YML file formats. All the functionality of TranslatePress is built right in, and you can do everything from your WordPress dashboard. In fact, you can use either the Visual Editor or String Translation Editor to select and translate strings — without ever leaving WordPress.
The TranslatePress Language Switcher
A fantastic feature of TranslatePress is the language switcher. You can give your visitors the power to select their preferred language on the front end. There are three language switchers available, so you can use whichever one(s) works best for your site’s design. You can use:
Shortcode: Allows you to place a language dropdown in a widget.
Menu item: Put your language dropdown right in your nav menu.
Floating: Places a button in any corner you like, where users can click and select a language.
Setting up a language switcher is super easy, and your visitors will appreciate the ability to choose their preferred language — which means they’ll spend more time on your site!
Cost
The cost difference when comparing TransplatePress with Transifex is clear.
The lowest tier starts at just €7.99 per month, with the highest tier topping out at €20.99 per month, billed annually. In addition to the core functionality of the TranslatePress plugin, you also get multiple Add-ons and Premium Support.
There are no additional translation costs unless you choose to use third-party paid translation services from Google or DeepL.
Is TranslatePress a Good Transifex Alternative?
Again, Transifex is a good service for translating strings in a static website or app you’re developing. It might be a good fit if you’re technically savvy and comfortable with installing JavaScript on your site.
We believe TranslatePress is the best alternative for WordPress sites, especially if you need an easy, no-code solution. You get unlimited language support and a powerful visual editing tool. You can use it for free on your own site today.
TranslatePress Multilingual
TranslatePress is the easiest way to translate your WordPress site. It's fast, won't slow down your website, works with ANY theme or plugin and it's SEO friendly.
Get the plugin

